Saturday, October 30, 2010

Coconut Red Lentil Soup

I just adore a nice, warm, comfort to the soul bowl of soup. Absolutely adore it.  Once I cooked up the this delicious fall`ish soup in my little white kitchen*, I couldn't in good conscience hold back. Its got slivered green onions sauteed in butter and yummy golden raisins that plump up the coconut milk. And back notes of ginger... and toasted curry powder. Mmmm. All things that make this soup too good not to share. We've been enjoying big ladles of this soup over ~1/2 cup of warm barley - brown rice or farro would be good as well. Sprinkle each bowl generously with cilantro and the remaining green onions. I hope that you'll enjoy it as much as I did.

ps* - yes, I know, it`s awful, my whole kitchen is WHITE ... WHITE! Including the floor - the floor! I know! I wouldn`t wish a white kitchen floor on my worst enemy! I sweep that thing six times a day and STILL it looks like a weekly chore. When we move and eventually... eventually ... buy our own home I am planning on having a beautiful dark wood kitchen with wood floors.... mmmm... it`ll be beautiful.

Ingredients:

1 cup / 7 oz / 200g yellow split peas
1 cup 7 oz / 200g red split lentils (masoor dal)
7 cups / 1.6 liters water
1 medium carrot, cut into 1/2-inch dice
2 tablespoons fresh peeled and minced ginger
2 tablespoons curry powder
2 tablespoons butter or ghee
8 green onions (scallions), thinly sliced
1/3 cup / 1.5 oz / 45g golden raisins
1/3 / 80 ml cup tomato paste
1 14-ounce can coconut milk
2 teaspoons fine grain sea salt
one small handful cilantro, chopped
cooked brown rice, barley or farro, for serving (optional)


Directions:
1. Give the split peas and lentils a good rinse - until they no longer put off murky water. Place them in an extra-large soup pot, cover with the water, and bring to a boil. Reduce heat to a simmer and add the carrot and 1/4 of the ginger. Cover and simmer for about 30 minutes, or until the split peas are soft.

2. In the meantime, in a small dry skillet or saucepan over low heat, toast the curry powder until it is quite fragrant. Be careful though, you don't want to burn the curry powder, just toast it. Set aside. 

3. Place the butter in a pan over medium heat, add half of the green onions, the remaining ginger, and raisins. Saute for two minutes stirring constantly, then add the tomato paste and saute for another minute or two more.

4. Add the toasted curry powder to the tomato paste mixture, mix well, and then add this to the simmering soup along with the coconut milk and salt. Simmer, uncovered, for 20 minutes or so. The texture should thicken up, but you can play around with the consistency if you like by adding more water, a bit at a time, if you like. Or simmer longer for a thicker consistency. The thicker this soup got, the more I liked it.

 Serves 6.
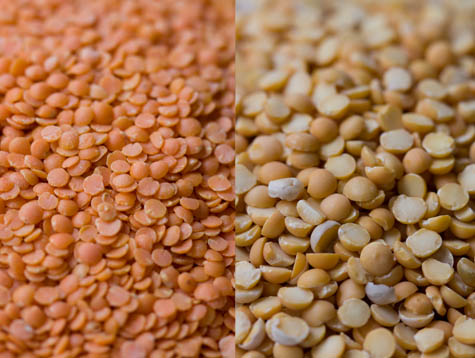
If you`re wondering: these are the kind of lentils that you should be looking for:
Coconut Red Lentil Soup

Butter-Pecan Sweet Potatoes


As many of you know, I am a Martha lover. Her website currently has a wonderful 'seasonal produce guide' for all of the 4 seasons. A couple of weeks ago, I posted the butternut-squash guide. This recipe comes from, well, the sweet potato bank. It was DELICIOUS. I think that it is going to be added to the Giles' Thanksgiving repertoire from now on. Personally I am really, truly not keen on the usual plain mashed sweet potatoes that you generally see around this time of year. Ick.  I don't know, maybe its a sensory, texture thing. I've just never been keen. But these guys... oh boy. You're in for a treat! As you can see, we served them up with a side salad & pork chops. Bon appétit!

Ingredients (for 4 servings):
- 4 medium sweet potatoes (2.5 pounds)
- 1 tablespoon olive oil
- Coarse salt
- 1 tablespoon butter, cut into small pieces
- 1 tablespoon light-brown sugar
- 1/4 cup pecan pieces
- dash of cayenne pepper

Directions:
1. Preheat oven to 400 degrees. Peel potatoes and halve lengthwise; slice crosswise 1/2 inch thick. On a baking sheet, toss potatoes with olive oil; season with coarse salt.

2. Transfer half the potatoes to a second baking sheet; cook both sheets until potatoes are tender, tossing occasionally, 25 to 30 minutes.

3. Sprinkle with butter, brown sugar, pecan pieces, and cayenne pepper, dividing evenly. Bake until sugar is caramelized and hard, about 10 minutes. Gently toss; serve immediately.

Spaghetti with Pecorino & Black Pepper


Now who doesn't love a good spaghetti? This is a pretty bold dish with lots of intense flavours. First off, for those who are wondering, pecorino variety of Romano cheese - think saltier Parmesan with a kick. It is very easy to find at the grocery store, no worries! 


The romano cheese in this recipe made me reminisce to the first Christmas Jeremy and I were married (4 years ago!). For Christmas, my cheese-loving mumma had given us this GIANT, and I'm talking GIANT block of romano cheese.  At first we didn't really know what to do with it! Then, that cheese started going on EVERYTHING. We sure did live the high cheese life for a couple of months. And that is the really nice thing with romano, it lives on for ages. Sadly though, we ended up breaking our grater we were grating so much romano :) Not surprisingly, that winter was also the winter of pirogies for Jeremy. Lots and lots of cheesy pirogies.   But this post isn't about pirogies, it's about spaghettis so lets get on with it. Bon appétit!! 

Ingredients:
Coarse salt
12 ounces spaghetti
1 1/2 cups finely shredded Pecorino Romano cheese (4 ounces)
1 teaspoon freshly ground black pepper

1 piece of boneless skinless chicken, cut into cubes
1 red pepper, sliced in long spears
1/2 red onion, chopped

Directions:
1. In a large pot of boiling salted water, cook spaghetti until al dente. Reserve 1 cup pasta water. 


2. While pasta is cooking, cook your chicken with a little bit of olive oil. When chicken is cooked, add onions and then red pepper. Red pepper should only cook for 1-2 minutes so that it is still relatively firm. 


3. Drain pasta; return to pot.

4. To pasta in pot, add 1 cup reserved pasta water. Gradually add 1 cup Pecorino, tossing constantly with tongs until cheese is melted; add pepper. Toss to coat pasta lightly; if desired, gradually add a little more pasta water to thin.


5. Top pasta with serving of chicken & red pepper dish and sprinkle each dish with a portion of your remaining 1/2 cup cheese. Enjoy! 

Pear and Granola Muffins

Mmmm. Muffin. Yummy, yummy pear muffin. Yummy, yummy HEALTHY pear muffin. This particular yummy yummy pear muffin has a crunchy granola topping that is a perfect foil to the soft and juicy pears inside. The low-fat yogurt that this recipe uses replaces much of the usual butter and makes the muffins super moist with a subtle tang. Whole-wheat flour is also a nice addition to make them even more wholesome. All around, some good stuff.


I've been enjoying these little guys in my lunches and for breakfast ... both of which are most often in the car, running to and from schools!  My community OT buddies know what I mean - sitting down to eat? What's that? I also brought 1/2 a dozen of these yummy little guys in to the hospital when I was doing some casual coverage and they got snapped up (doesn't that always make you feel so good?) with lots of requests for recipes. Bon appétit! 


Ingredients (Makes 12):
FOR MUFFINS
1 cup all-purpose flour
3/4 cup whole-wheat flour
2 teaspoons baking powder
1/2 teaspoon salt
1/2 teaspoon ground cinnamon
2 large eggs
3/4 cup packed light-brown sugar
1/2 cup plain low-fat yogurt
2 tablespoons unsalted butter, melted
3/4 cup plain granola
1 cup of pears, peeled and cut into 1/4-inch pieces


FOR GRANOLA CRISP TOPPING
(or use an additional 3/4 cup plain granola)
1/2 cup granola
1/4 cup all-purpose flour
1/4 cup packed light-brown sugar
1/4 teaspoon salt
3 tablespoons chilled unsalted butter

Directions
1. Preheat oven to 400 degrees. Line a 12-cup standard muffin tin with paper liners; set aside. In a large bowl, whisk together flours, baking powder, salt, and cinnamon.


2. In a separate bowl, whisk together eggs, brown sugar, yogurt, and butter. Make a well in the center of flour mixture. Add egg mixture to well, and mix in flour mixture until just combined. Gently fold in the granola and pears.


3. Make Granola Crisp Topping: In a bowl, toss together 1/2 cup granola, 1/4 cup each all-purpose flour and packed light-brown sugar, and 1/4 teaspoon salt. Cut 3 tablespoons chilled unsalted butter into pieces; add to granola mixture, and rub in with fingertips until clumps form.


4. Divide batter evenly among lined cups, filling each 3/4 full. Sprinkle with granola topping. Bake until a toothpick inserted in the center of a muffin comes out clean, about 20 minutes. Cool 5 minutes before removing from tin. Serve warm or at room temperature.


Peach & Plum Crumble

For our special Friday dessert, I decided to do a little spin on the peach crisp post that I put together earlier last week ... introducing, PLUM and peach crisp. It's a little different from my earlier post, this time with plenty of extra crisp, or crumble, or whatever you call the topping part. I suspect I'm like many of you in liking a high crisp to fruit ratio. When it comes down to it, I'm after a spoonful of oat-flecked crumbly crust, some deliciously warm and fragrant fruit, paired with a dollop of cold, creamy vanilla ice cream. I'm not sure it gets much better. Jeremy felt it didn`t have enough fruit, but I loved it. So there you go...

In my mind a good crisp recipe incorporates a few other considerations as well. First off, I don't like overcooked, un-textured fruit. I like that this cooking time is relatively short compared to other crumble or crisp recipes. Just enough to get the topping nice and golden. Also along these lines, use fruit that is ripe, but not overly ripe. You`ll want the fruit to retain shape and texture. Too ripe it goes to mush. Not ripe enough, you'll fight the stone fruits through the entire slicing and pitting process. They let you know when they are ready.

A couple other notes about this recipe: In addition to being very sweet, most crisp/crumble/ cobbler-type toppings are big-time butter bombs - unnecessarily so. This recipe tries to scale back a bit here without sacrificing taste or texture, and uses yogurt to keep things moist. Also, you can sweeten the fruit part to taste with whatever sweetener you prefer (white sugar, honey etc.)

So my wonderful cooking family, do enjoy this crisp recipe, and feel free to swap in your favourite stone fruits and berries. You could also do individual versions in ramekins as well. Bon appétit! .


Fruit:
1 pound ripe peaches
1 pound ripe plums
1/4 cup natural cane sugar (or brown sugar)
1 tablespoon plus 1 teaspoons arrowroot (or cornstarch)
a scant 2-3 teaspoons lemon juice (to prevent the fruit from browning) 

Crisp:
3/4 cup rolled oats
3/4 cup white whole wheat flour (all-purpose flour)
1/2 cup natural cane sugar (or brown sugar)
1/2 teaspoon cinnamon
big pinch of salt
1/3 cup butter, melted
1/3 cup yogurt

1. Preheat the oven to 400F degrees.

2. Cut the peaches and plums into bite-sized, 1-inch pieces. I cut relatively chubby slices and then cut them again in quarters or thirds. Place the chopped fruit in a medium-sized bowl.

3. In a separate small bowl whisk together the 1/4 cup sugar and the arrowroot. Sprinkle over the fruit, toss gently (but well), add the dash of lemon juice, toss again, and transfer the fruit to an 8-inch square baking dish (or your favorite equivalent-sized, deep-sided, solid-bottomed tart pan).

4. To make the topping combine the oats, flour, sugar, and cinnamon together in a medium bowl. Stir in the butter, and then the yogurt and mix until everything comes together in a dough-like texture. Sprinkle the crumble evenly over the plum and peach mixture.

5. Place the baking dish in the oven, middle rack, and bake for about 20-25 minutes, or until the topping is golden. Sprinkle a bit more sugar on top as it comes out of the ovens, and if you have a lemon onhand, grate a bit of zest on top (optional). Enjoy warm or at room temperature.

Saturday, October 23, 2010

Fresh Peach Crisp

Last night for dinner I made a surprise special dessert for my husband. He knew that something was in the oven and that it smelled like a world of delicious deliciousness, but I wouldn't let him look until I pulled it out and had my "tada!" moment. I decided to make this dish on the fly because I thought it`d be fun to have something a little different for dessert other than yogurt & berries with our coffee & tea. I had all of the ingredients on hand anyways and the peaches were on their last breath, so what a perfect way to use em` up! All I can say is... Yummmmmmmmmmmmmm. We poured a little bit of fresh cream on top to really sweeten the deal. Another old favourite of course is to serve with vanilla ice cream. Bon appétit! 


Ingredients (for 4-5):
- 1 cup rolled oats
- 1 cup brown sugar
- 1/2 cup flour
- 1 tsp. cinnamon
- 1/2 c. butter
- 7-8 med. peaches or apples
- splash of lemon juice
- dash of white sugar

Directions:
1. In a mixing bowl combine oats, brown sugar, flour and cinnamon. Cut in butter until mixture is crumbly. 

2. Core peaches (or you could use apples); slice and put into a baking dish. Cover with a light splash of lemon juice (this prevents the fruit from browning) and a light sprinkling of sugar.

3. Sprinkle oat mixture on top of fruit and bake at 350 degrees for 40 minutes.

Friday, October 22, 2010

Lemon Roasted Chicken with Salad & Dilled Orzo

Is it just me or did anybody else not know that Orzo is actually a variety of pasta and not rice? For some reason or another (hmm... maybe because it looks a whole heck of a lot like rice), I was always under the impression that orzo was one of those hipster, upper-class kinda rices. Like say, arborio... or, I don't know ... risotto :) 
While shopping with a lovely colleague of mine in the Byward Market last week, we popped in to the ever-so-wonderful La Bottega (I just love the guy with the huge pipes cutting that massive block of cheese ...). She was looking for dried spanish sausage for one of her famous Philippino dishes and I just wanted to go for a walk and get out of the hospital for a few minutes. Needless to say, lo and behold, there it was in there - smiling back at us from the pastas from around the world aisle. Only 2.00$.  I thought to myself, "I'm going for it." And so did my friend. She too had never dived in to the exciting world of Orzo.  I managed to scrounge my delightful neighbour Karen`s last dregs of her fresh dill before she tore up her garden for the summer. We frequently share veggies and herbs over our fence - it`s a great system we`ve got going! 


The end result: This recipe was pretty yummy. The dill in the Orzo was a really different, kind of zingy taste that went along pretty well with the lemon. I have to say though that the two of us enjoyed the lemon chicken a whole lot more than the orzo and dill. Jeremy thinks that it might have been better if maybe if there was a `garlic infused` oil or something to spice up the orzo a bit more. That or you could just serve up the chicken with a nice veggie side dish. Up to you. It`s still very good, just maybe lacking a little something in the orzo. Any suggestions would be appreciated! Bon appétite!


Ingredients (to serve 4):
- chicken (about 6 1/2 pounds), cut into 10 pieces
- 4 garlic cloves, smashed
- 2 lemon, quartered
- 1 teaspoon dried oregano
- 3 tablespoons plus 1/2 teaspoon olive oil
- Coarse salt and ground pepper
- 1 cup orzo
- 1/2 teaspoon dried dill
- 2 tablespoon red-wine vinegar
- greens for your salad


Directions:
1. Preheat oven to 450 degrees. Set a large saucepan of water to boil.
2. On a large rimmed baking sheet, toss together chicken, garlic, lemons, oregano, and 1 teaspoon oil; season with salt and pepper. Roast chicken, skin side up, until golden and cooked through, 25 to 30 minutes.
3. Meanwhile, generously salt boiling water. Add orzo, and cook until al dente; drain well, and return to saucepan. Add dill and 1 tablespoon oil; season with salt and pepper, and mix gently to combine.
4. In a large bowl, whisk together vinegar and remaining 2 tablespoons oil; season with salt and pepper. When chicken and orzo are ready, add arugula to bowl; toss to coat. Drizzle chicken with pan juices, and serve with lemon wedges, orzo, and your salad.

Thursday, October 21, 2010

Caraotas Negras (Venezuelan Black Beans)


Kavi, this recipe goes out to you. Little TJ sure did seem to enjoy these beans on Jeremy`s Venezuelan birthday dinner night :) 


When I first laid eyes on my husband to be, little did I know what yummy culinary dishes his family would introduce me to. 
For those who didn't know, Jeremy grew up in Venezuela. Right downtown in Caracas. His parents had moved there to start a new church. Jeremy recounts fond memories of freshly-squeezed orange juice from an abundance of inexpensive oranges, delicious fruits we`ve never heard of here and of course, as is the custom in most South-American food repertoires, bundles and bundles of BEANS. The beans, or, `caraotas,` that were an all-time favourite were made up in a special black bean dish that was an essential part of "Pabellon Criollo", Venezuela`s national dish (pictured above). When Jeremy & his family moved back to Canada, they were confronted with a very scary fact: nobody knew how to make the infamous caraotas negras!!   Apparently, in Venezuela, you can just buy a 'package' of caraotas negras seasoning at the 'marcado'. I don't know what this would be like here... sloppy joe sauce? taco seasoning? ... Needless to say, it took a long time and lots of trials to get this family recipe right. These beans are really, really yummy and a good dish to make at the beginning of the week for lunches. They work well as a topper for arépas as well, which I`m sure I will blog about at some point soon (the arépas are the little corn cakes in the upper right corner of the picture). I also think that it`s a good thing to eat more beans. Beans are so good for you and we hardly eat enough of them.  A cup of beans goes a very long way. Do enjoy & bon appétit! 


ps - a little tidbit from the Jerms: if you`re going to do your beans in a pressure cooker to speed things up a bit, don`t pressure cook the onion. It will completely spoil your meal. Also, WATCH THE SALT. This dish is also easily spoiled by adding too much salt. 


Ingredients:
- 2 cups black beans, dried 
- pork (hock, ribs, riblettes etc.)
- 2 chopped onions
- 4 cloves of crushed garlic
- 1 tbs. cumin
- 2-3 tsp. salt
- 4 tbs. freshly chopped cilantro
- 1 chopped green pepper


Directions:
1. Soak your beans overnight. Rinse them out in the morning and put them in the slow cooker with the meat.
2. Add water to cover the beans and cook on high all morning.
3. In the early afternoon, add the chopped onions, garlic, cumin and salt. 
4. Before serving in the evening, remove the bones from the meat and shred the meat. 
5. Make a pot of rice...
6. Add the fresh cilantro and green pepper to your beans. Serve hot on a bed of rice.  

Saturday, October 16, 2010

Puff Pastry Chicken Pot Pie. Oh baby, oh baby.

I still remember my dad buying dozens upon dozens of chicken, beef and turkey pot pies from the little old ladies at our first church in Corunna. They would bake up hundreds of these little guys over a weekend and sell them as a fundraiser. You could tell what kind of pie it was by the C, B or T marked-out on to the top of the pie by the prongs of a fork. For years we had oodles of little pies in our downstairs freezer. My dad just loved em'. Absolutely loved em'. So here's to you daddio, have mum make you a yummy puff pastry version! 

I adapted this following recipe from Ms.Martha into something that makes just a bit more sense for me. It’s quicker (it should only take about an hour, rather than all day, and even less time if you have a rotisserie chicken or chicken left overs instead of poaching your own - turkey of course is another great option), and I don’t mind saying the finished product doesn’t suffer one bit. This version is also simpler to serve and to save, as long as you have a few little oven-safe bowls. Heats up great the next day.


A little forewarning, this recipe is still a little involved, but not too crazy. The ingredient list is a mile long but most of these items you should have already. I didn't have a couple of things on the recipe but my little guys turned out great, so don't worry about the wine or freshly chopped parsley if you don`t have the on hand ... you get the idea! Bon appétit! 

Ingredients (to make 4 generous servings in 16-oz oven-safe dishes)
- 1/3 pound frozen puff pastry (that is to say half a box)
- 5 tablespoons all-purpose flour, plus more for dusting
- 3 tablespoons unsalted butter
- 1 medium-large onion, chopped
- 2 medium potatoes, cut into 1-inch pieces
- 2 medium peeled carrots (about 8 ounces), cut into 1-inch pieces
- 2 large cloves fresh garlic, diced
 - 1/3 cup white wine (I used about a 1/4 cup lemon juice)
- 1 1/2 cups low-sodium chicken broth
- 1 cup milk
- About a pound and a half boneless skinless chicken breasts, poached and cut into small bite-size cubes
- 1 cup frozen peas
- 2 tablespoons chopped fresh flat-leaf parsley (or about 2 teaspoons dried parsley)
- 1 teaspoon dried thyme
- 1 teaspoons coarse salt
- 1/2 teaspoon freshly ground pepper
- 1 large egg
- 1 egg yolk
- 1 teaspoon water
- A sprinkle of garlic powder


Directions:

1. Prepare pastry. Thaw puff pastry according to package directions and roll it out on the counter to about 1/4″. Place all four of your dishes upside-down directly onto the puff pastry, with about 2″ space in between. With a knife, cut a circle around each bowl, leaving about 1″ of pastry visible around the edge. Place the dough circles on a baking sheet, cover with plastic wrap, and stick it in the fridge.


2. Place a rack in lower two-thirds portion of the oven. Preheat your oven to 425 (375 if it’s a convection).

3. Make filling. In a large heavy-bottom pot, melt 3 tablespoons butter over medium-high heat. Add onion, potatoes, garlic and carrots. Cook, stirring occasionally, until potatoes and carrots are fork-tender, 10 to 12 minutes. (It’s gonna smell like delicious home fries this whole time. Do your best not to eat it right out of the pan.)  Add wine and cook for 30 seconds. Add flour, and cook, stirring, for 1 minute. Pour in chicken stock and milk. Bring to a simmer; cook until thick and bubbly, stirring constantly, 2 to 3 minutes. Stir in chicken, peas, parsley, and thyme. Season with salt and pepper. Transfer to your four dishes and let them cool on a rack for about 5 minutes.


4. Make egg wash. In a small bowl, whisk together egg, extra egg yolk, some garlic powder, and 1 teaspoon water.

5. Assemble pies. Remove dough circles from refrigerator, and brush surface evenly with egg wash. Place each circle egg-wash-side-down over a bowl, pressing lightly to seal overhanging crust to the side of the dish. Brush top surface of each pie with egg wash. Cut a little X in the middle of each pie to allow the steam to vent.


6. Bake. Transfer pies to a parchment- or foil-lined baking sheet. Bake for 10 minutes; cover loosely with aluminum foil to prevent crust from burning, and continue baking for 25 minutes more.

7. Serve hot, but not too hot. Give it a minute. A chicken pot pie will just as soon burn you as look at you, so either make sure these little suckers don’t see you coming, or go do something else for ten minutes before you dig in.

Tuesday, October 12, 2010

Quiche Lorraine

So I've been wanting to make a Quiche for a long time. A very, very long time. Problem is, my husband doesn't like 'eggy' dishes. No frittatas, no omelettes, and, of course, no quiches. I think that, deep down, we all really want our husbands, children, mothers in law et al. to enjoy what we cook for them. Given that my man doesn't like eggy dishes, I decided to pack this particularly eggy dish with lots and lots of meat. And CREAM. Delicious, yummy, real cream. The cream that he's been anxiously awaiting for me to open so that he can enjoy some super rich, creamy coffee.  As a little aside, I agree that the bacon, cheese and cream do not make this a particularly LOW FAT recipe, but we`re just eating a wedge right? ... Right?
So after the initial, "Oh No! Not Quiche...", I'm delighted to report that the non-eggy (neggy?) guy really enjoyed this quiche-extraordinaire. While I must admit that I was lazy, and, as usual, bought my pie crust, it really didn't matter. I got a big smile and an empty plate and isn't that all that really matters? Bon appétit!  

Ingredients:
- 6 slices bacon cut into 1/2" pieces
- 1/2 cup onions, thinly sliced
- 1/2 cup Swiss/Gruyere cheese, diced or grated
- 1/2 cup chopped ham (optional)
- 1/2 cup chopped, steamed broccoli
- 9" partially baked pie shell
- 3 eggs, beaten
- 1 cups cream
- 1/2 teaspoon salt
- 1/4 teaspoon ground nutmeg
- white pepper (go with black if that is all you have)

Directions:
1. Cook bacon until almost crisp. Remove it from the pan and drain on paper towels. Sauté onion in 2 tablespoons of bacon drippings until tender.
2. Preheat oven to 450ºF. Bake the pie shell for just a few minutes. Cover the bottom of the partially baked pie shell with onions, bacon and cheese. Beat eggs and cream together with the salt, nutmeg and white pepper. Pour all into the pie shell.
3. Bake for 10 minutes, then lower the heat to 350ºF and bake another 15 minutes.

Squish Squish Squash

I love butternut squash. Just love it. I thought that I'd share this yummy post from ... Martha ... with 31 different recipes to try with butternut squash. Every now and then she posts "Seasonal Produce Recipe Guides" that are fantastic. If you're keen, you may enjoy her sweet potato version as well. Bon Appétit! 

Wednesday, October 6, 2010

Walnut Crusted Chicken & Salad

I have a most wonderful, caring and very detailed-oriented family doctor. I believe that I'm one of his most frequent flyers with all of the visits I have to see him for with my back. I know most of the nurses by name and vice versa. A couple of years ago for my yearly physical, my doctor sat me down and wanted to know all about how much I was exercising, was I getting enough sun and, subsequently, vitamin D, how was my Calcium and Iron levels, and finally, how many nuts was I eating a day? This last question took me completely by surprise. Never before had I had a doctor ask me about my nut-intake. Like I said though, he's VERY detail oriented. After he popped the 'nut' question, I had a momentary flicker of panic as I realized that I barely ate ANY nuts. That day I decided to change my foolish ways and stock up on nuts. Lots and lots of NUTS. Thank you Dr. Eveleigh for swaying me from the error of my ways :)


This recipe is another high one on the yum, yum, yum, yum, yum factor. As you can see, I've been trying out different kinds of chicken crusts lately (see peanut crusted chicken a couple of weeks ago) to try to a) use up the unbelievable amount of nuts I have in my baking cupboard and b) not let my doctor down. This recipe is pretty easy and you're baking your chicken, which is nice. The recipe calls for an 'oven proof' skillet, which, of course, we didn't have, so I just lightly fried them and then popped them on to a PAM'ed baking sheet. Bon Appétit! 


Ingredients:
- 2 slices whole-wheat bread, dried 

- 1/3 cup walnuts (toasted)
- 2 tablespoons Parmesan cheese, freshly grated 
- Coarse salt and ground pepper
- 1 large egg white 
- 4 chicken breast halves, boneless and skinless (6 to 8 ounces each) 
- 1 tablespoon oil 
- Lemon slices, for serving 
- Seasonal green salad
Directions: 
1. Preheat oven to 425 degrees. In a food processor, combine bread, walnuts, and Parmesan; season with salt and pepper. Process until fine breadcrumbs form. Transfer to a shallow bowl. In another shallow bowl, beat egg white until frothy.
2. Season chicken with salt and pepper. Dip each breast into egg white, letting excess drip off, and then into crumb mixture, pressing to adhere.
3. In a large nonstick ovenproof skillet heat oil ov
er medium heat. Add chicken and cook until lightly browned, 1 to 3 minutes. Carefully turn chicken over and put skillet in oven. Bake until chicken is golden brown and cooked through, 8 to 12 minutes.
4. Serve chicken with lemon slices and green salad.


ps - apologies for the stock photo this time :( 


Saturday, October 2, 2010

Tortilla Cups with Yogurt & Fresh Fruit

This month in Everyday Food, Martha had a series on anything and everything "muffin-cup" that wasn't, well, muffins (I'm sure that in the weeks to come you'll see 'Muffin-Cup Mini Pizzas" or "Eggplant Feta Phyllo Muffin-Cup Pies"...). I have to hand it to that lady and her team of incredibly creative culinary ... cookers. They really are quite ingenious with their endless string of new recipes. I had a lot of fun making these guys up for a dessert this week. The only thing I'd recommend is actually BRUSHING the butter on because I just dribbled and rubbed the butter in with my hands and got many a butter-burn. In the end though, they look gorgeous and can be made with pretty much any kind of fruit you have hanging around your kitchen whispering, hey, I'd look so darn good in a  sugar-dusted tortilla cup... 


In the picture, these guys look quite well cooked because we made ours with whole wheat tortillas. The original recipe called for white tortillas but hey, go with what you've got. Use whatever kind of yogurt you'd like too. Bon appétit! 


Ingredients (for 6):
- 6 flour tortillas (the small 6`` kind)
- 2 tbs. unsalted butter, melted
- 2 tbs. granulated sugar
- 1 1/2 cups plain yogurt
- 3 tbs. brown sugar
- 1 1/2 cups fruit like berries, peaches, plums, nectarines etc. etc.
- 1 1/2 tsp. fresh lemon juice


Directions:
1. Preheat oven to 375 degrees. Lightly brush both sides of tortillas with melted butter and sprinkle both sides with granulated sugar. Lay tortillas over 6 jumbo muffin cups (tortillas will overlap). Bake until tortillas are soft and pliable, 3 minutes. Remove from oven and, with the bottom of a glass, gently press each tortilla into a muffin cup so it folds up and forms a cup shape. Bake until tortillas are crisp and golden at edges, about 12 minutes. Immediately remove tortillas from cups and let cool completely on a wire rack, 15 minutes.
2. Meanwhile, in a small bowl, whisk together yogurt and 2 tablespoons brown sugar. In another small bowl, toss together fruit, 1 tablespoon brown sugar, and lemon juice. To serve, divide yogurt mixture among cooled tortilla cups and top with fruit.

Chicken & Sweet Potato Puff Pastry Hand Pies

All I can say about this next post is that I had been awaiting this day my entire cooking life. I had always wanted to work with puff pastry, but, as I believe most of us do, always assumed that it was incredibly difficult. Reserved for the kitchens of the Cordon Bleu. Unreachable. I so desired  to take that culinary leap of faith. To just go for it. To reach for the PUFF. The buttery, flaky, melt in your mouth PUFF. When I saw this recipe in, once again, Everyday Food, I knew that my time had come. I`ve included some step-by-step pictures of these little guys in case anyone of you goes astray. It really was a miracle in the oven, watching these little guys, well, PUFF up. I have to say too that my husband just LOVED me when I made these pies. He absolutely loved me. Who doesn`t love to be loved? 


The possibilities of different dishes with puff pastry really are endless - just check out Pepperidge Farm's Puff Pastry recipe webpage (most appropriately located at puffpastry.com) which my mum and I have been gigglingly exploring this past week. We served up our pies with some broccoli baked up with some yummy swiss cheese. YUM. Bon appétit!


Ingredients:
1 cup roasted sweet potatoes, mashed
- 1/2 cup heavy cream 
- 1/4 tsp. ground coriander
- 1/4 tsp. ground cumin
- coarse salt and pepper
- all purpose flour, for rolling
- 1 sheet frozen puff pastry (thawed) 
- cooked chicken, cut into bite-size pieces (approx. 1 cup) 
- 1 large egg, lightly beaten
- greens for the side (beans, broccoli, brussel sprouts?)


Directions:
1. Pre-heat your oven to 400F. Peel your sweet potato and slice into 1/2" circles; align on a lightly oiled baking sheet and drizzle with a small amount of olive oil. Bake for about 20 minutes until the potatoes are tender through. You can do this a day or two ahead of time to save time if you want.
2. In a medium bowl, mash your sweet potatoes with a potato masher. Add the cream (we just used light cream), coriander and cumin; stir to combine. Season with salt and pepper.
3. Cook your chicken....slice in to teeny tiny pieces.
4. On a floured work surface, roll out puff pastry to a 12-inch square and cut into 4 squares. Divide your sweet-potato mixture among the bottom halves of the squares, leaving a good 1/2" border. Top each with 1/4 of your chicken and then brush your edges of the pastry with some egg. Fold top halves of squares over filling to make a triangle, then crimp edges with a fork. With a sharp knife, cut vents in pastry and brush with remaining egg.
5. Transfer to a parchment lined rimmed baking sheet and bake until golden and crisp, about 30 minutes, rotating your sheet half way through. 
6. In the meantime, make up whatever veggie it is that you're going to be serving as your side dish. For our broccoli, we blanched some fleurets, tossed them in the oven with some swiss cheese on top and just let the cheese melt. YUM. 


Here's the step by step instructions: 


This is HALF of the puff pastry sheet. It took 2 hours to thaw or you can pop it in the microwave on LOW for 2-5 minutes in its cellophane wrapper.


Roll out the pastry with a rolling pin to 12 inches... this was surprisingly easy!


After cutting your pastry in to 4 pieces, plop in your filling! Make sure that you leave about 1/2 an inch from the outside edges so that you can get a good clean seal. 


This is what your finished product should look like before putting it in the oven with the crimps and slits cut in and then covered with egg. Be proud, be very, very proud :)